
Are you looking to create professional and high-quality invoices for your business? Using a Google Docs or Excel invoice template is one of the best ways to ensure that your invoices are neat, legible and professional.
There are dozens of templates available online from the likes of Microsoft and other publishers. These templates allow you to create invoices easily without spending hours creating your own framework on Excel before you can invoice.
Excel invoice templates enable you to invoice in minutes. Saving you time and ensuring that you will get paid as soon as possible.

Get Weekly Freelance Gigs via Email
Enter your freelancing address and we'll send you a FREE curated list of freelance jobs in your top category every week.
Business owners, and small business owners, in particular, have endless invoicing and billing responsibilities. These responsibilities can quickly pile up if you have many clients, customers, and vendors to invoice, making the process tedious and stressful.
Using an Excel invoice template will allow you to cut through the stress and create invoices at scale without wasting valuable time in the process.
By using the right templates, you can customize your invoices according to your business’s needs and your brand identity. Templates allow you to quickly create and send invoices online, helping you to keep track of your billing paperwork more easily too.
How to Create an Excel Invoice Template
You can also create your own custom Excel invoice template to use for your business. Creating your own template gives you complete control over what you include and how you present your invoices to customers, vendors, and clients.
Alternatively, you can create invoices in Excel using previously defined templates.
Here’s how:
Using a Predefined Excel Invoice Template
Step 1: Open Excel
Open the Microsoft Excel program in your Windows operating system by searching for ‘Excel’ in the search box and clicking on the Excel icon. This will open the Excel home page.
Step 2: Search for invoice
Use the home page search box to search for Excel invoice templates by typing in ‘invoice’. Once you press enter, you will find a huge range of predetermined invoice templates stored online and available through the Excel program.
Remember that you will need a WiFi or internet connection in order to search for these templates.
Step 3: Pick a template
Browse through the templates until you find one that matches your business’s needs. Click on the right template to open it.
Step 4: Open it
Once you’ve selected your chosen template, Excel will give you the choice to download it and customize it in the Excel program. Click on the ‘Create’ button to download your template and open it in Excel.
Step 5: Customize it
Now that you have chosen and opened your template, you can customize and edit it in any way you choose. Add your official company name to the template and upload a company logo or letterhead if you wish.
It’s important to add your company’s business address, area code, and contact information to ensure that clients can contact you easily when they need to.
Step 6: Enter deliverables
Your Excel invoice template will display columns for the descriptions of your products and services and their prices. Add your prices as per the products or services you have provided. Then, check that Excel’s algorithms will calculate the final total amount.
All Excel templates use formulas to keep your final total accurate. You can add tax rates and additional charges where relevant using the appropriate areas of your template.

Step 7: Save the template
Once you have updated your invoice and are satisfied with how it looks, you can save your template for future use.
Select the ‘File’ menu from the Excel menu at the uppermost corner of your screen and click on ‘Save As’. This will give you the option to enter a name for your invoice.
Once you have done this, click the ‘Save’ button to save your invoice template to your computer. Now you will be able to call up this template whenever you need it, update the details, and save copies of it for each of your invoice runs.
Step 8: Use & repeat
Each time you update your Excel invoice template, remember to update the date, the invoice number, the client it’s addressed to, the products and services sold, the total costs, and any other information that may have changed since your last invoice run.
You can create templates for each of your clients or customers individually, or update your template with new client and customer information each time you generate a new invoice.


Creating Your Own Excel Invoice Template from Scratch
Step 1: Open Excel
Open the Excel program on your Microsoft Windows operating system by typing ‘Excel’ into the search box and clicking on it. Once the program is open, select the ‘Blank Workbook’ option to open up a blank Excel page.
Step 2: Lay out the details
It’s time to add essential details to your invoice under each cell.
Start with your company name, company address, the date of the invoice, and the invoice number. Adjacent to this information, list your customer’s details, including their business name, and the address and contact details of the customer in question.
Underneath this information, add columns titled ‘Product Description’, ‘Quantity’, ‘Amount’ and ‘Subtotal’. The ‘Total’ and ‘Tax’ columns are usually placed underneath the subtotal column to ensure that Excel’s formulas can correctly total your sums.
Feel free to add a thank you note to the footer of your invoice template.
Step 3: Style it
Add some visual interest to your template by creating it in the form of a table and using the ‘Cell Styles’ option under the Home tab to add accents, colors and borders.
Step 4: Enter formulas
To calculate a running total in Excel, you need to use the Excel AutoSum function. Simply select a cell below the subtotals you want to add (your ‘Total’ column), click AutoSum on the Home tab in the Editing group, press ‘Enter’, and you can insert a Sum formula automatically.

Then, click and drag your mouse across all of the subtotals you want to add to manually select the range, and hit the ‘Enter’ key. The AutoSum formula will add your numbers for you and display your total in the column you selected.
Step 5: Save your template
Save your new Excel invoice template by selecting ‘File’, ‘Save As’, and giving your template a title. Once you have titled it, choose the folder in which you wish to save it and select ‘Save’ to store your template for future use.
Open it in Excel whenever you need to use it, use ‘Save As’ to save a new copy, and update your invoice as you need to.
3 Free Excel Invoice Templates You Can Use Now
FreshBooks has several types of Excel invoice templates you can use to generate different invoices quickly and effectively.
Blank Invoice Template
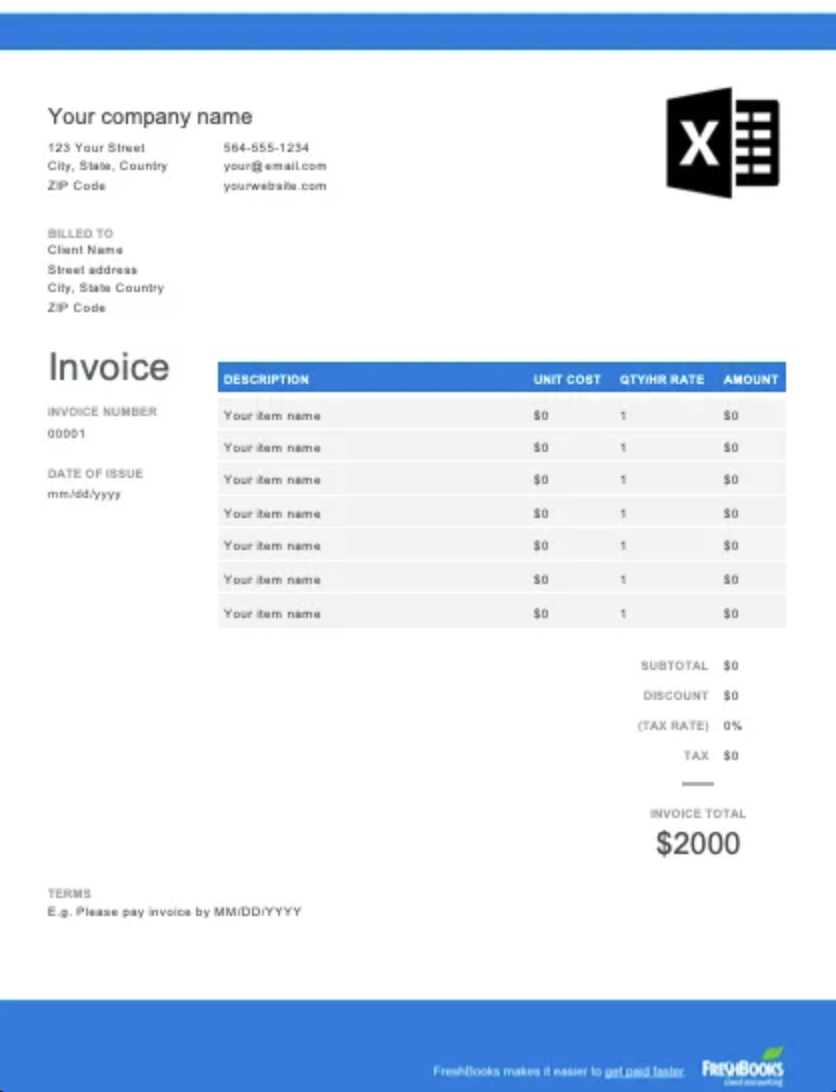
If you’re not sure where to start with creating an invoice, a blank template is an excellent point of reference to work from. The Blank Excel Invoice is not only easy to download, you can also customize it before you send it to a client. You can then use this as the template for all future invoices.
Billing Template
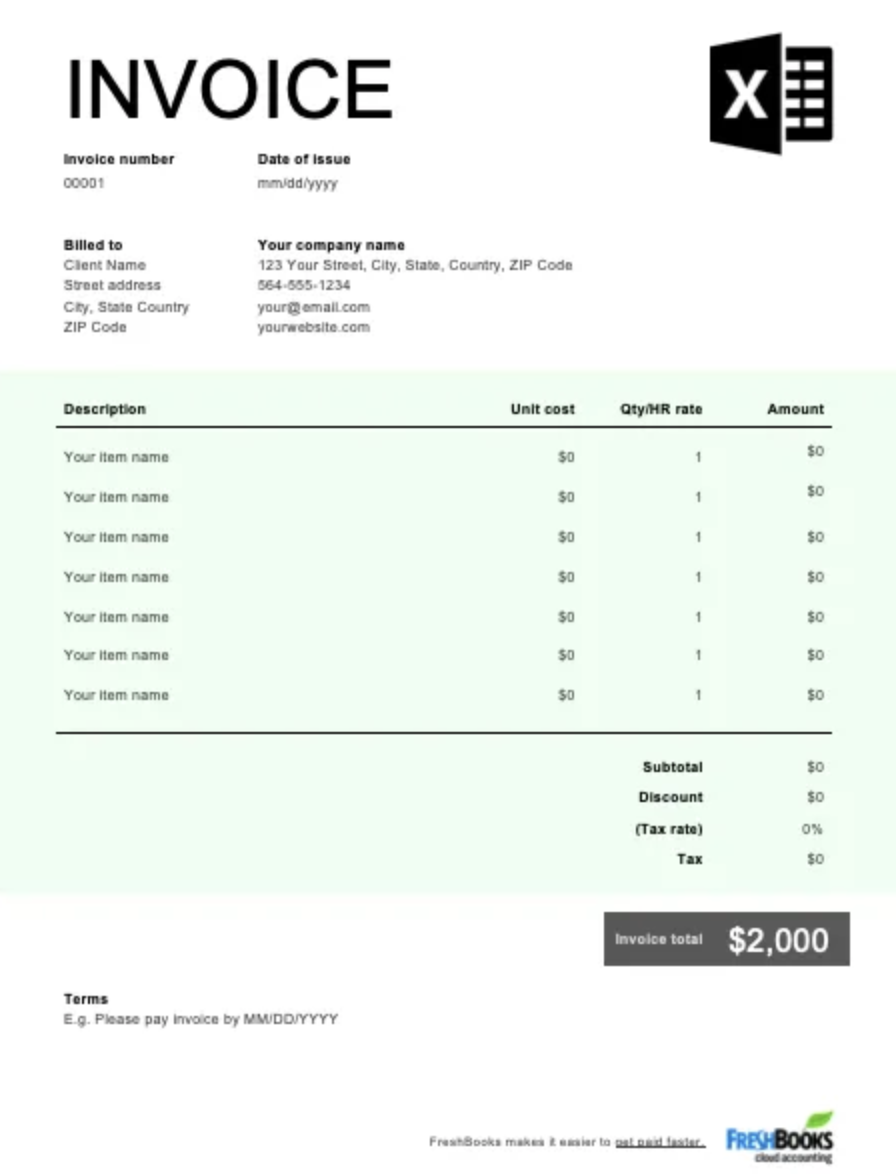
Billing is made simple with this Excel template. Also available for free download, you can edit the billing information and customize the invoice to reflect your brand. It automatically adds up all line items too, so even if you’re billing for a large order, the totals are all correct and viewable.
Excel Work Order

FreshBook’s Work order template makes capturing customer and job information simple. Its simple yet concise layout ensures you can provide a comprehensive summary of the labor and materials that were used to complete a job. Unit costs and quantities are automatically calculated for added ease of use.
All the FreshBooks downloadable templates are as easy to use as a blank Excel workbook, so anyone familiar with Excel will find them straightforward. Plus, they’re downloadable in various formats, including .DOC, .XLS, .PDF, Google Sheets and Docs. These templates are also very useful for tax purposes for both your business and your clients.
Use the right template to generate invoices quickly and get paid as soon as possible.
How Using an Excel Invoice Template Can Help You
You may be wondering why you should use an Excel invoice template to create your invoices. The simple answer to this question is that using Excel templates can save you hours of time, simplify your invoicing process, and ensure that you are viewed as a professional.
There are hundreds, if not thousands, of Excel invoice template pages available online, giving you instant access to the specific templates you need for your business. These templates offer a high degree of customizability, and boast simple layouts that are pre-prepared for you. This means that your invoicing work will be minimal, as you only need to fill out the relevant fields, double-check the data, and send the invoice to your client within minutes.
The customizability of online Excel invoice template pages can also be a fantastic marketing tool. You can customize your invoices to add special messages targeted towards your clients, thanking them for their business and suggesting other products and services that they may be interested in.
Adding your business’s logos, letterheads, headers, footers, fonts and color schemes will help to create brand cohesion, boosting your brand awareness and ensuring that your clients know who invoices are from the minute they open them.
Reducing the amount of time you spend on invoicing will allow your clients to enjoy more consistent and instantaneous gain rates. Using templates ensures that your clients and customers will receive their bills as soon as possible, which will mean that they are more likely to pay your invoices on time. Getting paid on time will streamline your business’s cash flow, allow you to pay your staff on time, and service your debts without incurring additional interest.
Handy Invoicing Tips for Professional Invoices

If your invoices are not detailed, professional and easy to read, you run the risk of confusing your clients and customers and not getting paid on time. Incorrect invoices may also put some customers off from doing business with you in the future.
Use these invoicing tips to ensure that you use your Excel invoice template pages to your advantage.
Always double-check your invoices before sending them out
Nothing looks less professional than an invoice that displays incorrect subtotals and totals, outdated prices, incorrect dates, misspelled company names, and other glaring errors.
It’s absolutely essential that you check your invoices for clarity and correctness before you send them to your recipients. If you can consistently send out correct invoices, you will help to build trust between your business and its clients.
Number every invoice you send out
Numbering your invoices is an easy trick that will help you identify every invoice without having to sort through dozens of files. You can assign each of your clients their own invoice number, or number your invoices according to how many bills you send out each month.
Include a ‘payment due by’ date to get paid on time
If you don’t specify when a payment is due, some clients may assume that they can pay you at their leisure. Be clear on when payments are due and if there will be any penalties for late payments. This keeps you and your clients on the same page and maximizes your chances of getting paid as soon as possible.
Keep your business contact information up to date
After you enter your contact information into your Excel invoice template, you need to keep it updated, especially if your business has changed important details, like its contact number or email address.
Incorrect details can cause delays in payments and frustrate your clients, who may not be able to get in touch if they have any queries or issues. Make a point of checking your invoice template’s contact information monthly to avoid misunderstandings and delays.
Accept a range of different payment methods if possible
If you want to get paid on time, offer your clients as many ways to pay as you possibly can, including bank transfers, online debit orders, eWallets like PayPal, and other trusted payment platforms. Remember to list the payment forms you accept on your invoices so that your clients know which methods you accept.
Store past invoices carefully
You may need to refer back to your invoices to check up on late payments and submit your tax returns. One of the many benefits of using an Excel invoice template for your business is that you can store your digital invoices on the cloud without any need for hard copies.
Consider storing your invoices on an external hard drive or on a cloud-based service like Google Drive to ensure that you can always access them when you need them.
Consider implementing late payment fees
This is a great way to encourage customers and clients to pay on time, as they will face financial penalties if they don’t. You can charge a percentage or a flat fee as you see fit. Most business owners will wait until an invoice is 30 days overdue or longer before imposing late payment fees, but you can decide how best to implement these penalties depending on the nature of your work.
Be sure to mention late payment penalties and your conditions for these penalties are clearly on the invoice so that your clients know what to expect if their payments are late.
An Excel-lent Way To Invoice
Using an Excel invoice template for your business’s invoicing processes gives you maximum control over the look and content of your bills. There are hundreds of different templates to choose from, many of which are specifically designed for certain businesses or processes.
Downloadable Excel invoice template pages are easy to customize with your brand’s information and images to create cohesion around your brand and boost brand recognition at the same time.
Using an Excel invoice template will allow you to create comprehensive, professional and easy-to-read invoices to help you get paid on time and make an impression on your clients.
Keep the conversation going...
Over 10,000 of us are having daily conversations over in our free Facebook group and we'd love to see you there. Join us!